Table of Contents
How to Use NearHub Tail with NearHub Board?
Step 1: Switch the Screen Casting Platform on NearHub Board. Find [Settings] in the bottom right corner of NearHub Board. Find [NearHub Cast] in the System. Click [Screen casting platform] to find [N…
Table of Contents
Step 1: Switch the Screen Casting Platform on NearHub Board
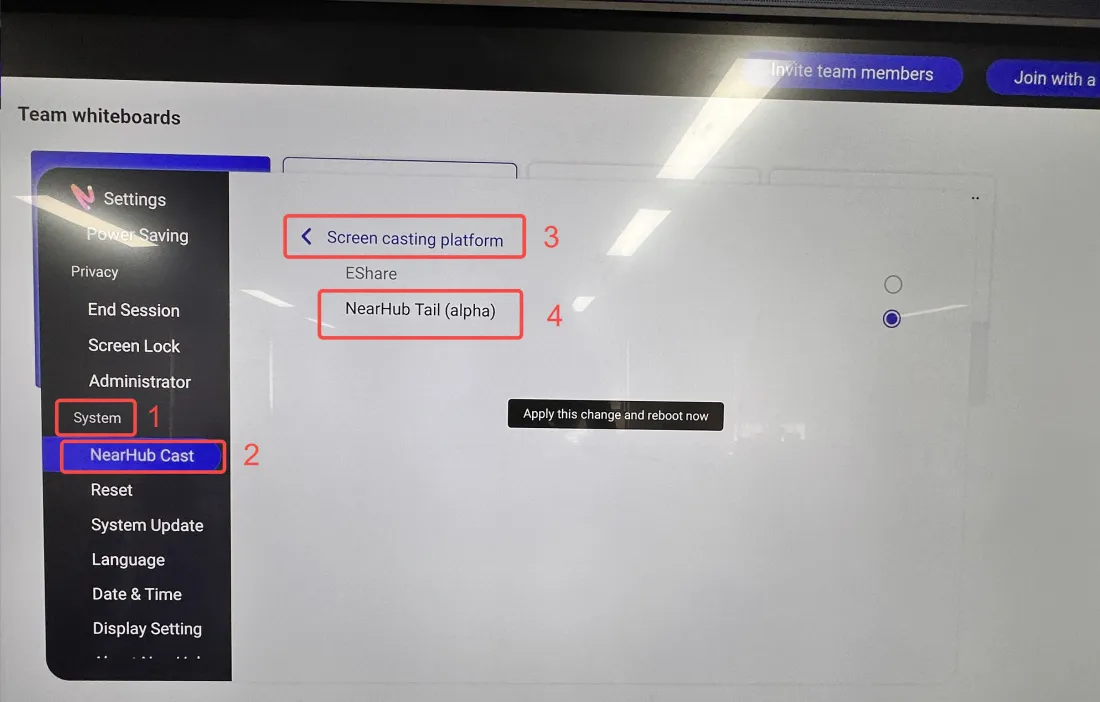
- Find [Settings] in the bottom right corner of NearHub Board.
- Find [NearHub Cast] in the System
- Click [Screen casting platform] to find [NearHub Tail (alpha)], then check this option to complete the platform switch.
To ensure that NearHub Tail can be used smoothly and successfully, you need to make sure that the casting platform on your NearHub Board has been switched to Tail mode before using Tail. Now, let me show you step-by-step how to switch casting platforms.
Step 2: Pairing the Tail with NearHub Board
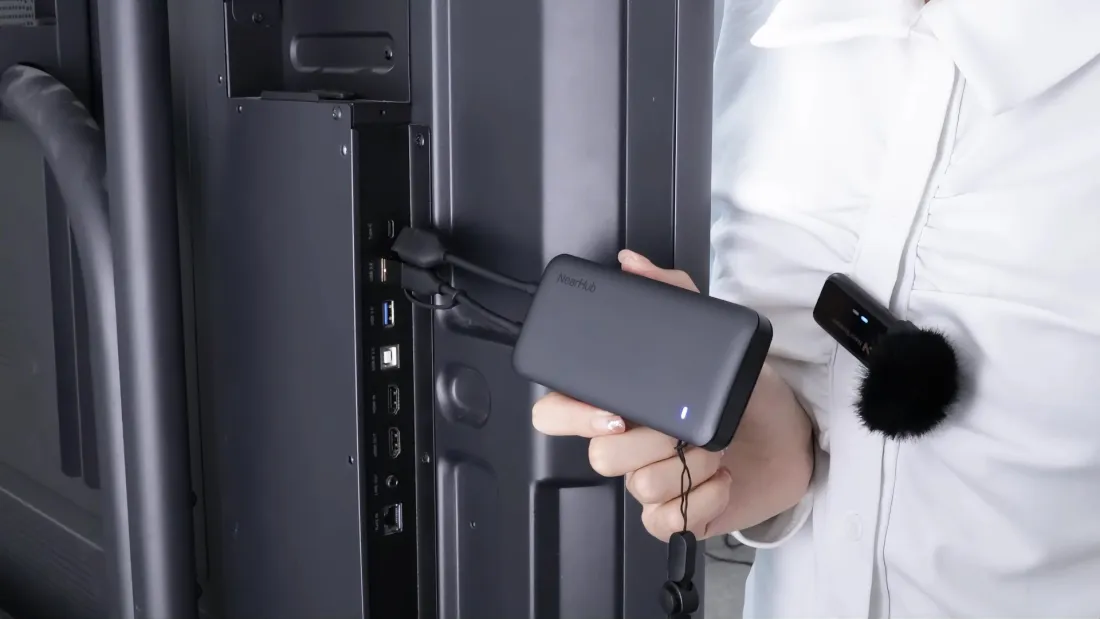
To achieve pairing, you need to insert the USB-A connector into the designated port on the screen. When you plug in the screen port, the blue light on it will start blinking. You are supposed to keep it plugged in until the blue light no longer flashes and becomes a long bright state.
When the blue light is long on, the tail is successfully paired with the board, and there will be corresponding pop-ups [Tail box connected] on the screen.
The premise of fast screen projection is that the Tail has been paired with your NearHub Board.
For your convenience and to minimize time spent on screencasting, NearHub Tail only needs to be paired with the NearHub Board once. When the first pairing is successful, there will be no need to re-pair during subsequent use.
Step 3: Connect the Tail to the Computer
Mac OS
- If you are a Mac OS user, after finishing pairing the tail with NearHub Board, just connect the type-C port of the tail to your MacBook, and wait for a few seconds to realize wireless screen casting. Then, there will be corresponding pop-ups [Welcome TailClient ] on the screen.
Windows OS
- If you are a Windows user, please link two cables simultaneously,HDMI and USB-A, to ensure smoothness and stability when using the Tail to cast the screen, considering that the USB-C ports on some Windows computers are only for charging and don't support audio/video data transfer. After successfully casting the screen, there will be corresponding pop-ups [Welcome TailClient ] on the screen.
After pairing, you need to unplug it from the board and connect it to the computer. Once connected to the computer with the appropriate interface, you can quickly achieve the screen projection.
* It is also feasible for some Windows computers to connect directly with USB-C.
* If the casting fails, please repeat all the steps from pairing the tail with your NearHub Board onwards.

These types of connectors comprehensively address the diverse needs of computer screen projection. Depending on your computer specifications, you have the flexibility to opt for any of these methods that best suit your requirements.Once the Tail has achieved a successful pairing with the board, you have the convenience of directly connecting it to your computer for screen projection. This simplifies your meeting preparations and enhances the efficiency of your meetings and presentations.
How did we do?
Quick Start Guide To Set Up NearHub Board